Most B2B distributors run supplier data onboarding the same way every time, and that way is bespoke. A new supplier signs, the buyer hands over a spreadsheet, the catalogue team negotiates what columns they actually need, a back-and-forth runs for weeks, and the products land half-populated.
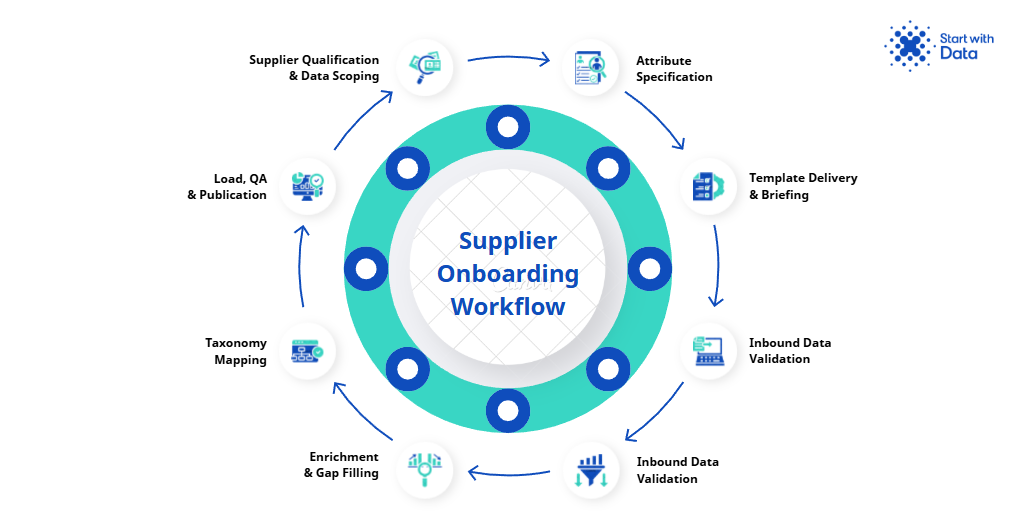
The supplier onboarding process should be a repeatable workflow with templates, validation rules, and exception handling, not a one-off project run from scratch every time. The seven stages below are the workflow we use with B2B distributors who want to onboard new ranges in days instead of months.
Why supplier data onboarding fails in B2B distribution
We see the same root cause across distributor catalogues. Supplier onboarding is owned by procurement, not by the data team. Procurement signs the contract, then hands over a spreadsheet with no specification attached. The catalogue team scrambles to make it work. Every supplier delivers data in a different shape. Validation happens after the fact, usually when a category manager complains the filters do not work on the new range.
The other failure pattern is the absent specification. There is no document anywhere that tells a supplier what “complete” means for your business. Required attributes are implicit, sitting in someone’s head. Validation thresholds drift. By the time the data lands in the PIM, the gaps are baked in. As we have written elsewhere, most product data is not broken, it is unfinished, and supplier onboarding is where that unfinished work begins.
The fix is the same as for most product data problems:
- uinely need bespoke handlingReplace bespoke effort with structure
- Define the process
- Define the spec
- Run the same workflow every time, with documented exceptions for the cases that gen
That’s the shape of the product data services work we do with distributors.
Stage 1: Supplier qualification and data scoping
The first stage happens before any data changes hands. You need to know what you are onboarding before you set up the rest of the workflow.
Inputs: signed supplier contract, product range summary from procurement, supplier’s existing data formats (PIM exports, datasheets, ERP extracts, anything they will share).
Activities: confirm SKU count and category mix, identify which of your master taxonomy nodes the range maps to, assess supplier data maturity on a three-point scale (PIM-mature, spreadsheet-only, datasheets-only), and decide which onboarding track the supplier follows. A supplier delivering structured PIM exports for 200 SKUs is not the same project as one shipping 8,000 datasheet PDFs.
Outputs: a scoping sheet with category coverage, SKU volume, data maturity, target go-live date, and onboarding track assignment.
Common mistake: skipping the maturity assessment and giving every supplier the same template. Sophisticated suppliers object to filling fields they already provide in structured form, and immature suppliers cannot fill half the fields you sent.
Stage 2: Attribute specification
This is where most onboarding processes have nothing written down. Fix that first.
Inputs: master attribute schema for the relevant taxonomy nodes, channel requirements (your ecommerce site, marketplaces, customer portals, EDI feeds), and any regulatory attributes the categories demand.
Activities: for each category in scope, generate the required attribute list and the optional attribute list. Specify controlled vocabularies, units, formats, and conditional rules. Map the supplier’s source fields to your master attributes where their export structure is known.
Outputs: a per-supplier attribute specification document. It names every field, defines acceptable values, and marks each one as required or optional with the reasoning written next to it.
Common mistake: writing the spec once and reusing it for every supplier and category. The required attribute set for cable trays is not the required set for circuit breakers and treating them as equivalent is how you end up with empty attribute columns six months after go-live.
Stage 3: Template delivery and supplier briefing
Send the supplier a populated template, not a blank Excel sheet.
Inputs: the attribute specification from Stage 2, the supplier’s source data sample, and your template format (usually a structured spreadsheet with dropdown validation and inline guidance).
Activities: pre-populate the template with what the supplier has already provided. Hold a 30-minute briefing call to walk them through the fields, explain what completeness means for go-live, and agree the delivery date. Provide written field definitions and example values for every controlled vocabulary.
Outputs: a template the supplier knows how to complete, with a delivery deadline they have agreed to.
Common mistake: emailing the template with no briefing and waiting. We have seen suppliers spend three weeks filling fields they did not need to fill, while leaving the required ones blank.
Stage 4: Inbound data validation
When the supplier returns the template, validation runs automatically. It does not wait for a human review.
Inputs: the completed template, the validation rule set (covered below).
Activities: run schema checks (every required field present, every controlled value within vocabulary, every numeric field in range, every conditional rule satisfied). Score the file. Anything below the agreed completeness threshold gets returned to the supplier with a structured error report, not a “please fix this” email.
Outputs: a validation report, an accepted file, or a rejected file with line-level errors.
Common mistake: running validation manually. By the time the catalogue team has read 8,000 rows, the next supplier’s file has arrived. Validation must be automated and the rule set versioned.
Stage 5: Enrichment and gap filling
Even passed files have gaps. Required attributes the supplier could not provide need filling before publication, not after. We have written separately about the difference between cleaning and enrichment and why most distributors mix them up.
Inputs: the validated supplier file, datasheets and manufacturer URLs, third-party attribute libraries (ETIM, ACES and PIES, manufacturer feeds), and AI extraction tooling where appropriate.
Activities: identify gaps by required attribute and SKU. Triage by effort and impact. Extract from datasheets using AI tooling like SKULaunch where the volume justifies it, or manually for low-volume specialist ranges. Capture the source of each enriched value so it can be audited and re-run.
Outputs: a fully populated file ready for taxonomy mapping.
Common mistake: shipping incomplete data on the assumption that the supplier will provide it later. They will not. Missing attributes slow product launches and they stay missing for years.
Stage 6: Taxonomy mapping
Mapping the supplier’s category structure and attribute values to your master taxonomy is where most automation breaks down. It needs structured handling instead of ad-hoc judgement.
Inputs: the enriched file, your master taxonomy and controlled vocabularies, and the mapping rules established during scoping.
Activities: map supplier categories to master taxonomy nodes (one-to-one, one-to-many, or splits). Map controlled vocabulary values (their “316 stainless” becomes your “Stainless Steel 316”). Validate that each SKU has exactly one taxonomy assignment and that every attribute value resolves.
Outputs: a file mapped against the master taxonomy, ready for PIM load.
Common mistake: doing this work in the supplier’s data structure rather than yours, leaving translation work for the PIM team to pick up later. Categories and attributes are not interchangeable, and confusing them at this stage breaks search and filtering on the live site.
Stage 7: Load, QA, and publication
The final stage pushes the mapped file into PIM staging, runs quality assurance, and publishes to production channels.
Inputs: the mapped file, the PIM staging environment, the sample QA checklist.
Activities: load the file into a staging space. Run QA on a sample (typically 5 to 10% of SKUs across each category): does the PDP render, do filters work, do related products surface, do images and assets attach? Fix issues at file level, not in the PIM. Reload. Publish.
Outputs: live SKUs visible on the relevant channels, a sign-off record, a closed onboarding ticket.
Common mistake: skipping staging and loading direct to production. We have seen distributors publish 6,000 SKUs with broken filter logic because no one tested the new attribute values against the live site filter configuration.
Required vs optional attributes in the supplier onboarding spec
The hardest part of the supplier data onboarding spec is the line between required and optional. Get this wrong in either direction and the workflow stops.
Required attributes are the minimum set without which the product cannot be published. That usually means:
- Primary identifier (manufacturer part number, GTIN, or your internal SKU)
- Short and long product titles
- Primary category assignment
- Price (cost and list)
- Stock and lead time data
- Core technical attributes for the category (dimensions, weight, materials, electrical ratings)
- Primary product image
- Compliance attributes where regulated (REACH, RoHS, UKCA, ETIM class for electrical)
Optional attributes are everything that improves the PDP or enables filters but is not a hard publish blocker:
- Alternative titles and translations
- Marketing copy
- Secondary images, 360 views, video
- Cross-sell and accessory links
- Extended technical attributes used by a minority of customers
The mistake we see in spreadsheet-driven onboarding is asking suppliers for 180 attributes when 40 are publication-blockers and 140 can be enriched later. Suppliers fill the easy fields and leave the hard ones blank.
Validation rules for supplier data onboarding
Validation rules sit at three layers. Each layer rejects different problems:
- Schema validation checks the file is structurally correct: every required column present, every row complete on required fields, no rogue data types in numeric columns.
- Format validation checks individual values against rules: dimensions in millimetres not inches, weights in kilograms, GTIN passing checksum, price as decimal not text.
- Conditional validation checks relationships between fields: if “Category = Cables” then “Conductor Material” is required, if “Hazardous = Yes” then “UN Number” is required, if “Sold by length” then “Pack quantity” must be blank.
Distributors who do this well version their rule set and run it through automated tooling on every supplier file. The rules live in code or in a validation engine, not in a category manager’s head.
Exception handling
Some suppliers genuinely cannot meet the standard spec. The mistake is treating every exception as a bespoke project. The fix is to define exception types in advance and route them.
Three types cover most cases:
- Data delivery exceptions, where a supplier cannot provide a structured file at all and ships datasheets or images: route to the AI extraction track and bill the cost back where contracts allow.
- Attribute coverage exceptions, where a supplier provides 70% of required attributes but cannot source the remaining 30%: route to the enrichment team with a defined SLA.
- Taxonomy exceptions, where a supplier’s range straddles category boundaries that do not exist in your master taxonomy: escalate to taxonomy governance, do not let the catalogue team improvise.
Each exception type has a defined owner, a defined SLA, and a documented cost. That is the difference between an exception and a fire drill.
The supplier onboarding playbook
Every distributor we work with ends up with the same artefact: a one-page playbook per supplier. It records:
- Data scoping result
- Attribute specification
- Validation rule set applied
- Enrichment sources used
- Taxonomy mapping decisions
- Go-live date
The playbook isn’t a document anyone reads end to end. It’s the audit trail. When a category manager asks why a particular field is empty six months later, the playbook tells you whether that field was optional, whether the supplier couldn’t provide it, and what the enrichment plan was. Without it, every question becomes a forensic hunt across email chains and shared drives.
KPIs for the supplier onboarding process
Three KPIs reveal whether your supplier data onboarding process actually works:
1. Time to live: In calendar days from contract signature to first SKU published. Distributors running the bespoke approach typically sit at 8 to 14 weeks. The structured workflow above brings this down to 2 to 4 weeks for sophisticated suppliers and 4 to 8 weeks for datasheet-only suppliers.
2. Completeness at go-live: The percentage of required attributes populated across the supplier’s range at point of publication. Anything below 95% means validation was relaxed. Anything below 80% means the workflow broke and gaps were shipped anyway.
3. Post-launch correction rate: The percentage of SKUs that needed a fix in the 90 days after go-live. This number tells you whether validation was strict enough. Distributors who skip QA carry correction rates of 15 to 30%. Distributors who run the workflow above sit below 5%.
Track these KPIs by supplier and by category. Trends across suppliers tell you whether the workflow is improving. Trends within a single supplier tell you whether that supplier needs reclassification.
Putting it all together
The shift is from bespoke project to repeatable workflow. The seven stages above are the spine. The attribute specification, validation rules, exception handling, playbook, and KPIs are the framework that turns the spine into something a small team can actually run sustainably and at scale across forty active suppliers.
Distributors who get this right onboard new suppliers in days, ship complete data on first publication, and free the catalogue team from firefighting. Distributors who do not, run every new supplier as a bespoke project and burn the next decade rebuilding the catalogue every time a new range arrives.
If your current supplier onboarding process shows these symptoms (long time to live, gaps at publication, supplier-by-supplier improvisation), our product data services team can run a supplier onboarding audit against your current workflow and rebuild it to the structure above. Book a 30-minute call to scope the audit through our supplier data onboarding service.